
If you have just read my blog post, How To Start A Blog In 20 Minutes – 2018 Beginners Tutorial, and want to learn what to do next, this blog post is for you. I will be sharing with you the 5 most important things to do after installing WordPress.
1. Setup Your Blog Title And Tagline
This information will let your visitors know what your website is about, and it will also be visible to the search engines. To change these, From your dashboard, scroll down and click settings and choose general. From there, you will be able to choose your blog’s title and a catchy tagline. If you look below the title and tagline, you will also see that there are other fields that you can fill out. I would recommend you fill out as much as you can on the general setting page, especially your time zone.

2. Create A Favicon
A favicon is a little icon that appears in the browser next to your site title, which helps people to identify your blog. If you don’t create your own favicon, then it might show the favicon of your host provider, and this is not a good thing, especially if you plan on turning your blog into a business. Think of a favicon as a part of your brand; it helps people to remember what your blog is about.
You can choose to pay someone on Fiverr to create a favicon, or you can do it yourself using Canva. You can upload your favicon by using Jetpack or by going to Appearance on your dashboard and clicking on Customize the site identity.
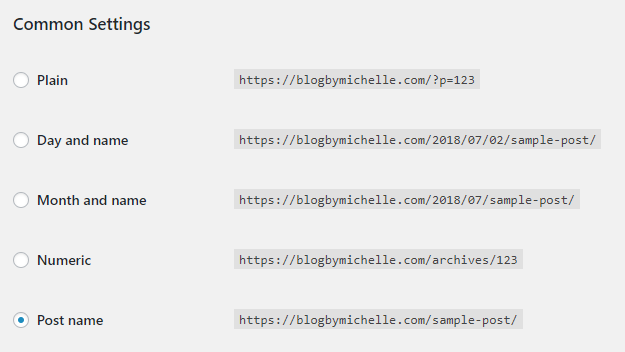
3. Change the permalink structure
The default permalink is not SEO friendly; therefore, it needs to be updated to Day and Name or Post Name options, but I personally use Post name options. To change this, your permalink navigates to settings, then click on the permalink.
4. Speed and Security
The speed and security of your blog are essential. I don’t know about you, but if I go on a website and I can’t scroll without it freezing or a page cannot load, then I click off that website. You also want to make sure that the content you work hard to create is backed up and kept safe in a secure vault and protected from hackers.
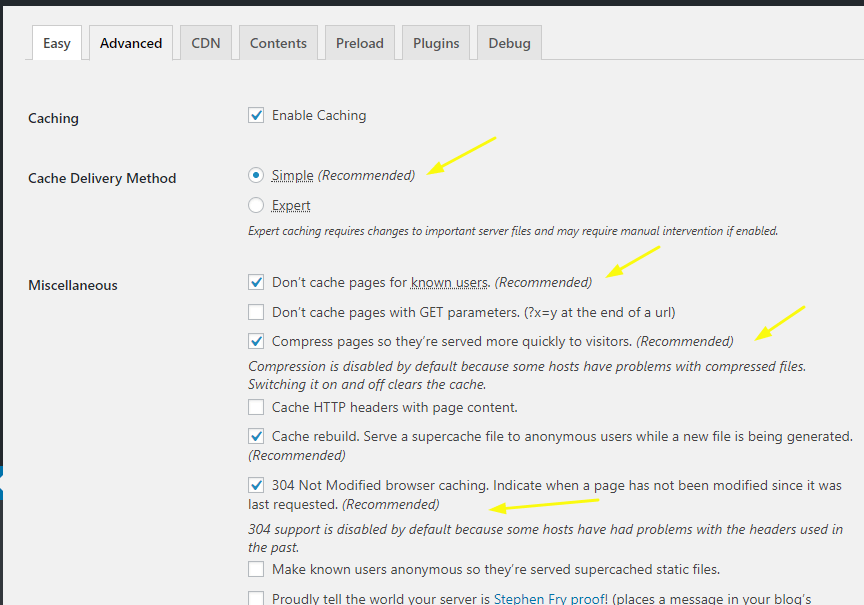
WP Super Cache – This is one of the best and most user-friendly cache plugins. It is simple to install and set up. If you are not sure what to do, just go with the default settings. Once you install the plugin click on settings, then Advance, and ensure each item with the word “recommend” is checked.
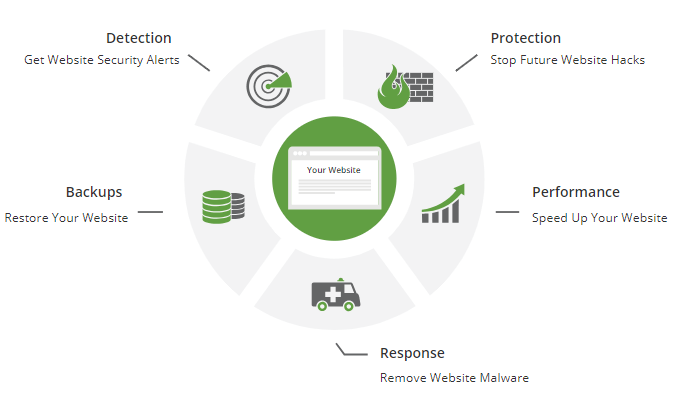
Scuri – This plugin protects your website from malware and hackers; it is one of the best plugins to keep your blog secure. Scuri offers a free version, but they also have full protection plans starting at just $199 a year.
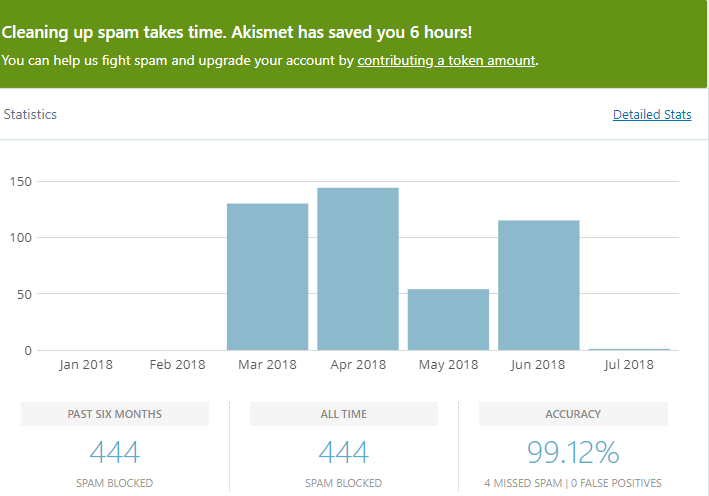
Akismet – Without a spam blocker, you would spend hours just trying to delete junk comments. Akismet will block all the spam comments posted tour blog; the best part is that you never have to see the comments. If the free version is not enough for you, then you can upgrade to get even more protection.
UpdraftPlus – is a free WordPress backup plugin that allows you to back up your blog and store it in a safe place. You can create a schedule for automatic backups, or you can do it manually. You can then save your backups to Google Drive, Dropbox, and much more.

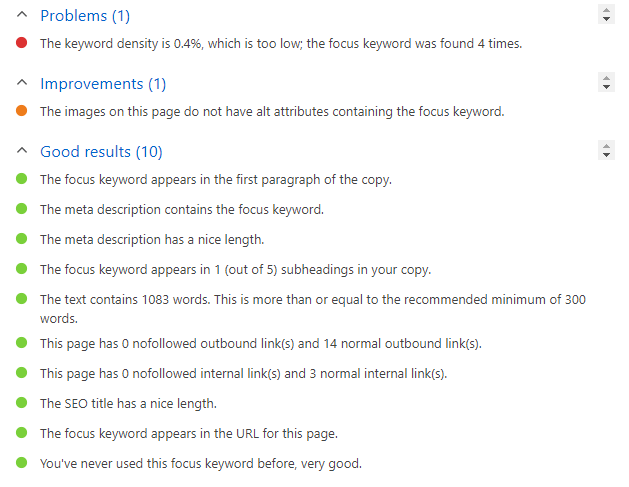
5. Install SEO plugins
Seo is an essential part of blogging; it helps the search engine to find your content. Most people are scared of SEO and not sure where to start, but with plugins like Yoast, SEO is not as scary.
Yoast SEO – This is the number one plugin that will help you to make sure your blog post is fully optimized and search engine friendly. While writing your blog post, Yoast will provide you with tips that will improve your readability, SEO, and grammar.
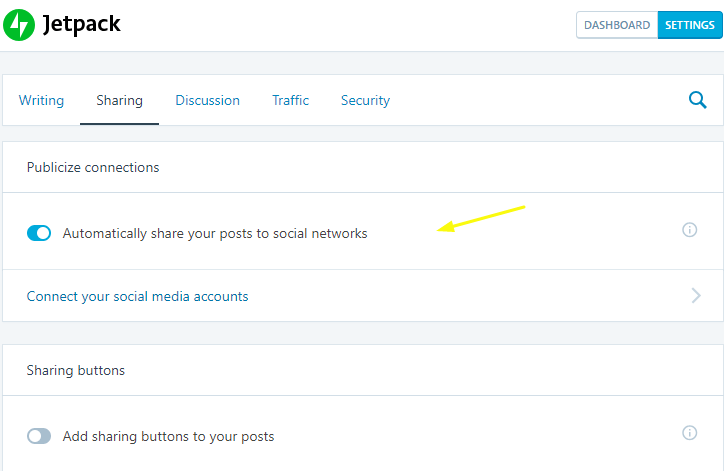
Jetpack – This is another excellent plugin that you can use to automatically share your new blog post to social media. It also has a host of other features like site stats, related posts, and much more. Install Jetpack, then go to settings and click on sharing; from there, you will be able to select the social platforms you want to automatically share your blog posts.
Here Is A list Of Some Of My Favourite Tools That I Use To Save Me Time And Money
All five steps mentioned above are essential in maintaining your blog and saving you from headaches. There are hundreds of plugins that perform the same function, but I choose the best plugins based on my research.
Bonus Steps
The links below are specifically for Bluehost because that is the host I personally use and recommend. If you are using another host, then you will need to check the support forum for instructions to set up your email and SSL.
How to Setup your email account
I have completed Steps 1- 5; now what? The Most Effective Content Creation Strategy


Nice article. It will help to all beginners